A reference key of glyphs hidden in the spectrogram of an audio signal from the video game Elite Dangerous. The glyphs look like scrawled symbols in scratchy handwriting. Each is labeled with a red number by a computer vision algorithm.
I've been totally sucked in by a puzzle in #EliteDangerous. I don't even play this game
08.10.2025 00:07 — 👍 2 🔁 0 💬 0 📌 0
Cool idea! I wonder a different grid system would make the word searching part more intuitive. It would make indexing in your code a lot harder, but a triangular or hexagonal grid may help by changing the number of available neighbors?
24.09.2025 16:07 — 👍 0 🔁 0 💬 0 📌 0
Wonderful! The little shadows really add a ton
06.08.2025 23:19 — 👍 2 🔁 0 💬 1 📌 0
Thanks!
03.08.2025 01:49 — 👍 0 🔁 0 💬 0 📌 0
Do you have any insight into when its best to move from exploration to implementation, or bounce back and forth? My sense is that this awareness is gained through practical experience in different problem spaces, and over time you learn to "feel" it. This makes it a tricky process to teach though!
02.08.2025 23:07 — 👍 1 🔁 0 💬 1 📌 0
To me, the advice to fully explore the problem-space is most useful for novices who need to be deliberate about not committing to a solution too soon.
On the other hand, experts can often do this exploration work implicitly by drawing from relevant experience to inform viable directions forward.
02.08.2025 17:31 — 👍 1 🔁 0 💬 1 📌 0
I think the ability to effectively switch between different design spaces is something that is developed over time, with expertise. Novices and learners tend to become quickly attached to early solutions because they offer solid ground in uncertain and ambiguous phases of the design process.
02.08.2025 17:31 — 👍 1 🔁 0 💬 2 📌 0
Oh that's awesome! Unfortunately, the video compression is really getting in the way...
01.08.2025 14:58 — 👍 1 🔁 0 💬 1 📌 0
U Michigan spent nearly a million dollars paying private spies to follow and harass its own students. The university is in crisis.
06.06.2025 12:58 — 👍 304 🔁 140 💬 8 📌 5
Man I hate the phrase "Vibe coding"
The least you can do is be honest with yourself.
04.06.2025 15:29 — 👍 1 🔁 0 💬 0 📌 0

First wood carving from my upgraded plotter! Results aren't outstanding, but it is a very solid first effort
16.05.2025 06:43 — 👍 3 🔁 0 💬 0 📌 0
 11.05.2025 15:02 — 👍 1 🔁 0 💬 0 📌 0
 11.05.2025 13:38 — 👍 1 🔁 0 💬 1 📌 0

This one is tuned a bit better - very happy with this result!
11.05.2025 13:14 — 👍 1 🔁 1 💬 1 📌 0

Plotter rebuild has begun #PenPlotter #PlotterArt
11.05.2025 12:48 — 👍 2 🔁 0 💬 0 📌 0

A line drawing of a sculpture of a The Veiled Woman by Corradini on display at the Louvre. Shading is accomplished by interacting sin waves.

A line drawing of a sculpture of a The Veiled Woman by Corradini on display at the Louvre. Shading is accomplished by cross-hatching.
Modified my cross-hatch shading algorithm to work with random pattern fills! On the left I'm using interactions between sin waves for shading, the right shows a traditional cross-hatching method.
This model of The Veiled Woman by Corradini in the Louvre is from ScanTheWorld (mmf.io/o/6479)
11.05.2025 12:30 — 👍 3 🔁 1 💬 1 📌 0
(you didn't ask but) the pitch of an ocarina is based largely on the "effective size" of the sound hole. Uncovering a finger hole increases the overall "effective size", and changes the pitch. So, if you change the size of the finger holes you can tune the notes! More holes should increase the range
10.05.2025 16:15 — 👍 1 🔁 0 💬 1 📌 0
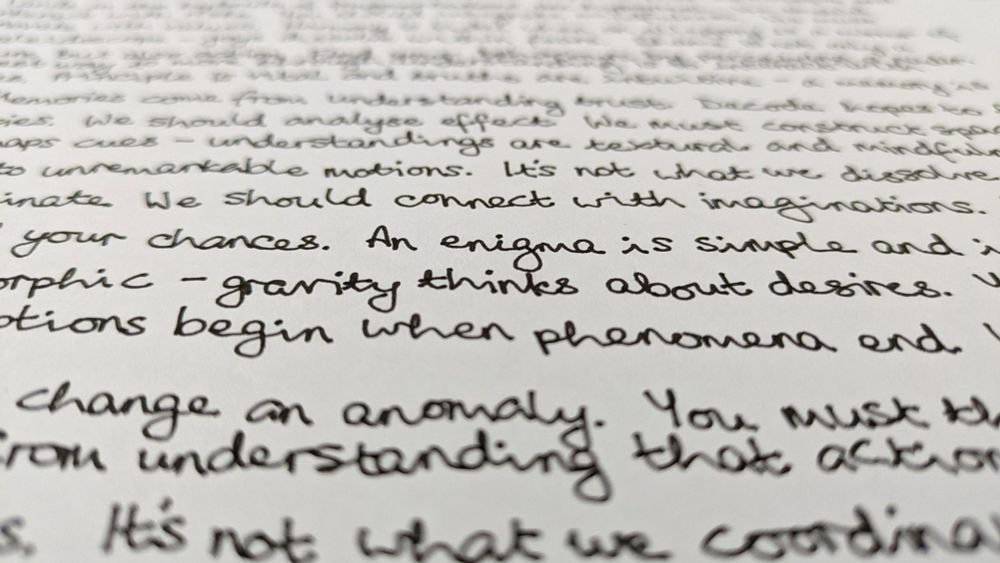
Coding my Handwriting — Amy Goodchild
Coding my handwriting in Javascript - how I did it and what I’m doing with it.
This is so inspiring! Thanks also for all of the wonderful detail in your blog - it is so nice to be able to learn from your process www.amygoodchild.com/blog/cursive...
09.05.2025 13:33 — 👍 5 🔁 2 💬 2 📌 0
You can also bend the bit of wire sticking through the hole toward your potentiometer pit to create a little bridge that the solder will stick to
08.05.2025 18:24 — 👍 1 🔁 0 💬 0 📌 0


You'd still be bridging with a pool of solder, but just to the neighboring hole that then has a wire attached.
08.05.2025 18:23 — 👍 1 🔁 0 💬 1 📌 0
Solder the pots to the board, connect the traces together with wire - best of both worlds.
08.05.2025 17:46 — 👍 1 🔁 0 💬 0 📌 0
Perf board is always a bit of a hassle, but you do need the traces/pads to solder to regardless. I prefer using wire jumpers instead of trying to bridge traces with solder because of the problem youre facing - the solder is designed to not stick between the copper bits so you do need to pool a bit.
08.05.2025 17:45 — 👍 1 🔁 0 💬 1 📌 0
Oh I see now - those larger case pins might not need to be connected to anything for the pot to function if you already have a ground pin and your application isn't super noise sensitive. If they are a hassle, you might be able to bend them out of the way and ignore them altogether!
08.05.2025 17:32 — 👍 1 🔁 0 💬 1 📌 0
Also make sure you connect the right pins to GND and High etc. I don't know what your pinout is so I just picked at random
08.05.2025 17:21 — 👍 1 🔁 0 💬 1 📌 0
If you move your pots down a row, solder on the orange spots to get your GND and high volt raisl. Then add wires to the blue spots to get the signal out from the potentiometers.
Also flux helps, but most electrical solder is flux core and it is not totally necessary for through-hole soldering.
08.05.2025 17:20 — 👍 1 🔁 0 💬 1 📌 0

It looks like your perf board has copper traces built in, so you should only need to add small blobs of solder to connect the traces together. Use a multimeter in continuity (beep) mode to test that electricity is conducted anywhere along the red and green paths respectively.
08.05.2025 17:20 — 👍 1 🔁 0 💬 3 📌 0

Thinking about making some plotter upgrades to improve rigidity and make the thing a bit more viable as a lightweight CNC router. #penplotter
08.05.2025 15:32 — 👍 3 🔁 0 💬 0 📌 0
The ultimate goal here is to create a visually interesting set of bellows that can provide low pressure air for a musical automaton. I am still a LONG way off from that though.
07.05.2025 13:29 — 👍 0 🔁 0 💬 0 📌 0

An origami-inspired folded tube (Kresling Pattern) constructed from laser-cut PET sheet sandwiched between layers of parachute nylon fabric. The image shows a mix of geometrically well-defined folded origami facets and organic crumpled fabric.
I earned my MS studying origami mechanisms and now that I have a laser module attached to my plotter I can continue some of the work I was doing back then!
Precision fabrication is still a major challenge, but this Kresling Tower structure made from PET and parachute nylon worked pretty well.
07.05.2025 13:29 — 👍 2 🔁 0 💬 1 📌 0

A DIY pen plotter with a cheap red 5.5W laser module attached to it. Below the laser is a piece of paper with some light lasercut lines over a plywood spoilboard.
Got the itch to work on a laser cutter mode for my plotter using this cheapo 5.5W laser module. Here's the first cut!
I tried to compensate laser power for feed rate, but looks like I went too far.
30.04.2025 16:42 — 👍 0 🔁 0 💬 0 📌 0
Artist, writer, educator, birder & nudibranch enthusiast. Author of Living in Data (MCDxFSG).
Illustrator, stop-motion animation enthusiast, and vintage motorcycle rider and wrencher. Indiana, USA. Worldwide at www.rednosestudio.com
Founder and creative director of Bellingcat and director of Bellingcat Productions BV. Author of We Are Bellingcat.
Mom. Combat Veteran. Blackhawk pilot. U.S. Senator. Illinoisan.
Mathematician and Computer Scientist, Smith College, USA.
https://cs.smith.edu/~jorourke/
Polyhedron displayed in banner has max volume of all foldings from a square.
Natural science Illustrator who loves prairies and insects and makes art and jewelry that feature them.
https://bio.site/karensnatureart
Senior writer at Slate covering courts and the law. Co-host of the Amicus podcast. Dad.
I am the host of Behind the Bastards and overlord of podcasts at Cool Zone Media
Graphic designer & paper engineer specialising in paper toys.
https://folduptoys.com/
📊 Data visualisation specialist.
💻 #RStats | #Python | #D3.
🎨 Generative artist.
🏃♀️ Runner.
Website: https://nrennie.rbind.io/
She/her. Views my own.
• French Artist & Printmaker
• Hand carved linocuts & Analog collages
• Sci-fi, Science & Space inspired work.
• Worldwide shipping > Shop here 👇
Shop : https://juliencatanese.bigcartel.com
Insta : https://www.instagram.com/julien_catanese
Digital Geometer, Associate Professor of Computer Science & Robotics at Carnegie Mellon University. There are four lights.
https://www.cs.cmu.edu/~kmcrane/
Theoretical Physics Ph.D., Computer Science Teacher. Author of “Intelligenza Artificiale” Zanichelli 2022.
I draw using mathematics and Python, no generative AI.
https://profconradi.github.io
https://x.com/S_Conradi
Natee Himmapaan (Puttapipat). Illustrator.
Art, literature, history, natural history, food, handwriting.
Depression, anxiety, & all that jazz.
Fatigued and extremely bitter about social media.
Non-binary (they/them). 🏳️🌈
https://linktr.ee/himmapaan
Plotter Art. Computer generated art drawn by a robot. You may know me as LandscapeArtBot for plotter art and procgen landscapes #plotterpeople #plotterart #penplotter #plotterverse #creativecoding Santa Fe, New Mexico
Artist | Excel nerd | Math art geek | Science fiction & fantasy writer | World builder
Generative artist, using code as a tool and mixing techniques like javascript and Blender3D.
www.idflood.com/links
I enjoy pain. That is why I code simulation engines.
My blog: http://brashandplucky.com
exceptional computer controlled machines
Curious artist and enthusiastic penplotter, Paris, France